

Fitting a cervical extrication collar correctly stands as a core skill for every first responder. Your actions directly influence spinal immobilization quality and patient recovery. A poorly fitted collar can compromise the airway, cause skin breakdown, or fail to stabilize the spine entirely. Research shows pressure injury rates range from 1.1% to 78.4% among trauma patients wearing these devices, making proper technique essential.
This guide walks you through preparation, measurement, application, and verification. You will learn how to achieve a properly fit extrication collar using universal principles. While adjustable extrication collars from manufacturers like Tianzuo Medical offer unique features, the sizing and application fundamentals remain consistent across all models.
Before you touch the collar, you must assess the patient and establish a clear indication for its use. This step protects you from applying a device that could do more harm than good. A properly fit extrication collar begins with sound clinical judgment, not with the hardware itself.
You should apply a cervical extrication collar when you suspect a cervical spine injury. The decision rests on specific clinical findings. Look for these indicators during your primary and secondary survey:
Any patient with a suspected cervical spine injury and a neurologic deficit should have a cervical collar in place, and should be referred immediately for neurosurgical or orthopedic spine consultation and imaging.
You must also recognize when a collar is not appropriate. Cervical collars are not recommended in trauma patients with isolated penetrating injury and no neurological deficits. The risks, especially airway access issues, outweigh the potential benefit of preventing secondary cervical injury. Routine cervical collar application is also not recommended due to documented complications. These include increased intracranial pressure, compromised respiratory status, hindered airway management, pressure ulcers, and overall patient discomfort. Your clinical assessment determines whether the collar serves the patient or creates new problems.
Once you decide a collar is indicated, you must maintain manual in-line stabilization continuously. Do not release it prematurely. This stabilization keeps the head and neck in neutral alignment while you prepare and apply the device. The patient's head should rest in a neutral position—neither flexed nor extended, neither rotated nor laterally bent.
For supine patients, you may need one or two assistants to maintain neutral alignment while you apply the collar. One assistant holds the head and neck in position. Another can help manage the patient's body or prepare the equipment. This team approach ensures the spine remains protected throughout the process. You should never attempt to fit a collar while also trying to hold the head steady. The risk of movement increases, and the quality of your fit suffers.
Manual stabilization also allows you to assess the patient's neck anatomy before you measure. You can feel the angle of the mandible and the top of the trapezius muscle. This tactile assessment prepares you for accurate sizing. Remember that adjustable extrication collars from manufacturers like Tianzuo Medical offer flexibility in fit, but they cannot compensate for poor positioning. The foundation of a properly fit extrication collar is a stable, neutral patient.
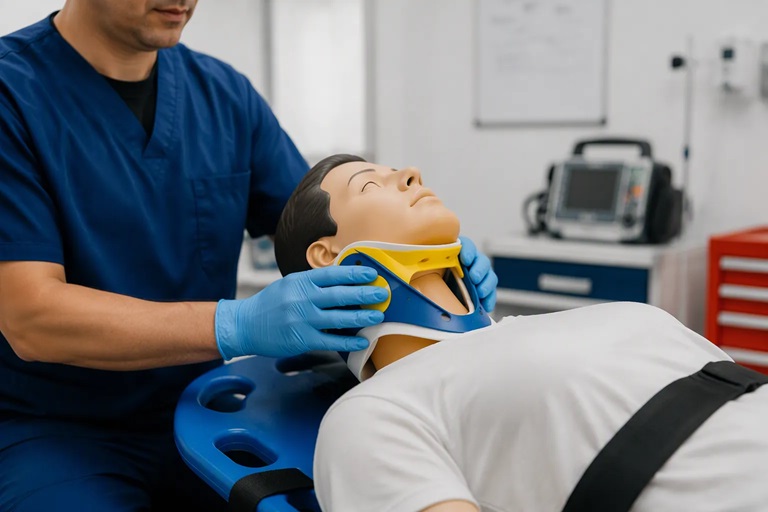
Accurate sizing determines whether your cervical extrication collar stabilizes or harms. A collar that fits poorly can create more problems than it solves. You must measure carefully before you select any device.
You need one critical measurement: the distance from the chin to the shoulder. This number tells you which collar size fits your patient. Take this measurement while an assistant maintains manual stabilization. The head must stay in neutral alignment throughout the process.
Follow these steps to measure correctly:
Locate the starting point: Find the bottom of the chin, right beneath the jawline. This spot sits at the angle of the mandible.
Identify the endpoint: Find the highest point of the trapezius muscle, where a shoulder strap would naturally rest.
Measure vertically: Run the measurement straight down from chin to shoulder. Do not measure diagonally, as this skews your result.
Maintain neutral positioning: Keep the head in neutral position while you locate both points. Any flexion or extension changes the distance.
Verify brand reference points: Some systems use the sternal notch instead of the trapezius as the endpoint. Check the specific collar brand's instructions before measuring.
Your fingers should feel both landmarks clearly. The angle of the mandible provides a bony reference that does not shift with soft tissue swelling. The trapezius ridge offers a consistent muscular landmark. When you find both points, measure the vertical distance between them.
Once you have your measurement, compare it against the manufacturer's size chart. Collars such as the Stifneck model come in four adult sizes and two pediatric sizes. Each size covers a specific range of neck heights. Refer to the size chart from your collar manufacturer, such as Tianzuo Medical, for exact specifications.
Most adjustable extrication collars allow some flexibility within each size range. You can fine-tune the fit after selecting the closest size. However, you cannot compensate for a fundamentally wrong size. A collar that is too small will not support the chin properly. A collar that is too large creates dangerous gaps.
Cervical collars that are too large for the patient, or those strapped too tightly around the neck, may worsen distraction by pushing the head even farther away from the trunk (Ben-Galim, Sibai, Hipp, Heggeness, & Reitman, 2008).
This distraction effect defeats the purpose of immobilization. Instead of stabilizing the spine, an oversized collar actively pulls the head away from the body. You must avoid this outcome through careful measurement and size selection.
When you select a size, choose the one that matches your measurement most closely. If your measurement falls between two sizes, select the smaller option. A slightly snug collar provides better support than a loose one. You can adjust the fit during application.
Remember that a properly fit extrication collar begins with accurate sizing. Take your time with the measurement. Recheck your landmarks if you feel uncertain. The few extra seconds you spend measuring correctly prevent complications later.
After you select the correct size, you can proceed to application. The next section covers how to position the collar and secure it properly.
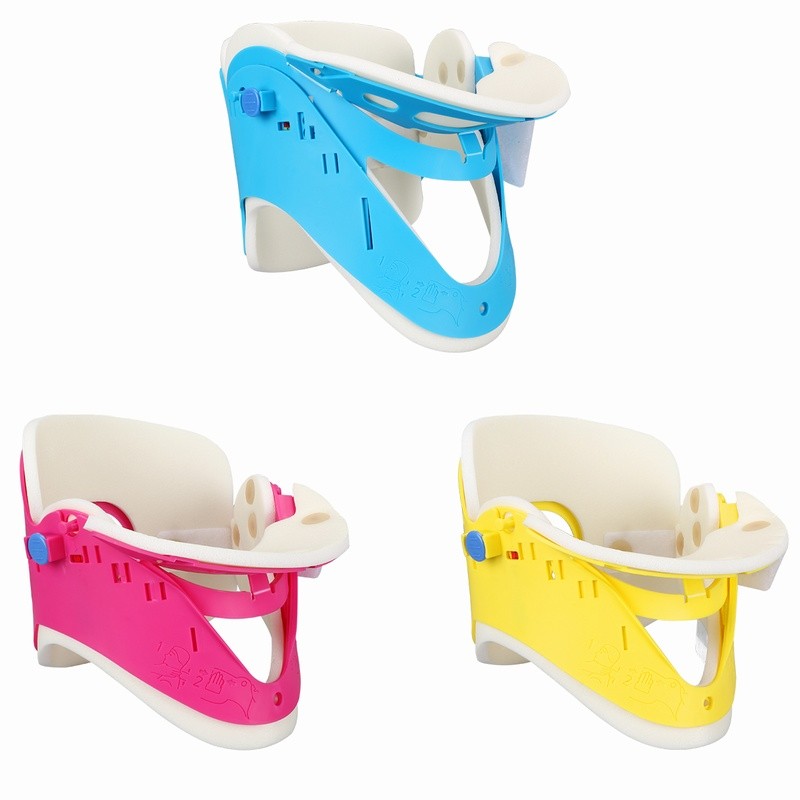
You have your measurement and your selected size. Now you must apply the device correctly. This phase determines whether your properly fit extrication collar achieves its purpose. A perfect size means nothing if you position the collar incorrectly.
Begin with the back panel. Slide it behind the patient's neck while your assistant maintains manual stabilization. Center the panel evenly against the posterior neck. The midline of the collar should align with the midline of the patient's spine. You should feel the panel rest against the trapezius muscles on both sides.
The back panel must sit low enough to support the base of the skull without pressing into the cervical vertebrae. Check that the panel does not gap away from the neck. A gap indicates the collar is too small or positioned too high. Adjust the panel before you proceed.
Bring the front panel up under the chin. The chin piece must cradle the mandible completely. The front panel should overlap the back panel on both sides. Secure the Velcro straps snugly against the collar's body. Pull each strap until it holds the collar firmly in place.
You should hear or feel the Velcro engage fully. A partial attachment can loosen during transport. Run your finger along the strap to confirm complete contact. The front panel should sit flush against the chest and neck without twisting.
A properly fit extrication collar feels snug but never tight. You must check three critical functions after securing the device. The patient must breathe without restriction. They must swallow without choking. They must open their mouth without strain.
Ask the patient to take a deep breath. Watch their chest rise fully. Listen for any wheezing or stridor. Then ask them to swallow. Observe their throat for movement. Finally, ask them to open their mouth. Their jaw should move freely without the chin piece digging into the mandible.
The collar should permit full range of motion for the jaw while preventing any movement of the cervical spine. If the patient cannot open their mouth, the collar sits too high or the straps are too tight.
Check the space between the collar and the patient's neck. You should be able to insert one finger between the collar and the trachea. This space confirms adequate venous return and prevents pressure on the carotid arteries. If you cannot insert a finger, loosen the straps slightly.
Adjustable extrication collars allow fine-tuning within each size range. You can modify the chin piece height on many models. You can also adjust the strap tension to achieve the ideal fit. Use these features to accommodate individual anatomy. A patient with a thick neck may need a looser strap. A thin patient may require a tighter fit to prevent shifting.
Recheck the chin position after any adjustment. The mandible must rest fully in the chin cup. The collar should not push the head into extension or flexion. Your properly fit extrication collar maintains neutral alignment while allowing patient comfort.
Verify that the collar does not obstruct airway access. You must be able to open the airway quickly if the patient deteriorates. Some collars feature a tracheal access window. Know your device's design before you need it in an emergency.
After you secure the collar, reassess the fit completely. Check that the chin rests properly in the chin piece. The mandible should sit centered and supported without tilting forward or backward. Look at the airway. You must see an unobstructed path from the mouth to the trachea. Any collar edge pressing against the throat demands immediate correction.
Palpate the neck beneath the collar. Feel for excessive pressure on the trachea or the carotid arteries. You should slide one finger between the collar and the skin with minimal resistance. If you cannot, loosen the straps and recheck the fit. A cervical extrication collar that presses too firmly can restrict venous return from the brain. This restriction raises intracranial pressure and creates unnecessary risk for your patient.
A cervical collar that is fitted too tightly can compress the carotid arteries and neck veins.
sk the patient about comfort. They should report a snug but tolerable sensation. Numbness, tingling, or pain in the neck or shoulders signals a problem. Check neurovascular status in both upper extremities. Compare pulse strength, sensation, and motor function on each side. Document your findings clearly. A properly fit extrication collar supports the head without compromising circulation or nerve function.
You will encounter common fitting errors during practice and real calls. Recognize each one quickly and correct it before transport begins. The most frequent mistake involves choosing the wrong size. A collar that is too small gaps at the chin or fails to reach the trapezius ridge. A collar that is too large pushes the head into extension, creating dangerous distraction forces on the cervical spine.
Another common error involves improper strap tension. Over-tightening causes the problems described above. Under-tightening allows the collar to shift during movement. Adjustable extrication collars let you fine-tune tension after initial application. Use this feature deliberately. Pull each strap until the collar holds firm, then verify the finger-space test again.
Positioning errors also occur. The back panel may sit too high, pressing into the occiput. The front panel may twist to one side, leaving the chin unsupported. Correct these issues by loosening the straps, repositioning the panels, and resecuring. Always recheck neutral alignment after any adjustment. The head must remain in the same position you established during manual stabilization.
Remember that a properly sized collar rarely fits too tight when applied correctly. The design distributes pressure across the chest, shoulders, and mandible. Your main concern is verifying patient comfort and neurovascular integrity. Practice these checks until they become automatic. Your attention to verification separates effective immobilization from a device that merely looks correct.
You now hold the complete sequence: prepare, measure, apply, verify. Each step builds on the last. A cervical extrication collar supports spinal immobilization, yet it never replaces your hands. Manual stabilization remains the true foundation of safety.
Practice these steps regularly with your team. Familiarize yourself with adjustable extrication collars from your specific manufacturer, such as Tianzuo Medical. Know their size charts and adjustment features before you need them in an emergency.
By following these steps, you can ensure the safety and comfort of your patient during a critical moment.
You should aim for snug but never restrictive. Slide one finger between the collar and the trachea. If you cannot insert your finger, loosen the straps. The patient must breathe, swallow, and open their mouth without difficulty.
Yes. Adjustable extrication collars accommodate varied body types through multiple size options and fine-tuning features. Measure carefully from chin to shoulder. Select the closest size, then adjust strap tension and chin piece height to achieve proper alignment and comfort.
No. Leave the cervical extrication collar in place during X-rays and CT scans. Most modern collars use radiolucent materials that do not interfere with imaging. Removing the collar risks unnecessary spinal movement. Only remove it when a physician clears the spine clinically.
Recheck the fit after any patient movement, transfer, or position change. Assess neurovascular status in both upper extremities at each check. Look for skin redness beneath the collar edges. Document your findings each time you verify the collar remains properly positioned.
Yes. Children have proportionally larger heads and shorter necks than adults. Use pediatric-sized adjustable extrication collars designed for their anatomy. Measure carefully and verify neutral alignment. Pediatric collars distribute pressure differently, so check skin integrity more frequently during prolonged transport.

 IPv6 network supported


 English
 فارسی
فارسی français
 Deutsch
 русский
 italiano
 español
 português
 العربية
 Türkçe