

To size an extrication collar correctly for an adult, measure the vertical distance from the highest point of the trapezius muscle to the bottom of the chin. Match that measurement to the manufacturer's gauge.
You must complete this measurement before applying any collar. Another rescuer must maintain manual in-line stabilization throughout the extrication process. Never release stabilization early to verify fit.
This direct method is the only reliable way to size a cervical collar. The cervical collar must fit snugly. A properly fitted c-collar prevents tissue damage. Accurate extrication collar sizing keeps the neck in neutral alignment, supports the chin, and prevents pressure injuries.
A collar does more than hold the head steady. The correct fit decides whether the device protects or injures the patient. Choosing the right size of cervical collar keeps the neck in neutral alignment from the base of the skull to the shoulder line. It cradles the chin without lifting it. It fits snugly without creating pressure points. The fit also determines how long the patient can tolerate the device.
Extrication collar sizing starts with a straight measurement from the highest point of the trapezius muscle to the bottom of the chin. For an adult patient, that measurement determines which collar to select. An appropriate sized collar matches the manufacturer's gauge exactly. A loose guess invites movement; a tight guess invites tissue damage.
When you choose a collar that is too tall, the chin rests on a ledge above its natural line. The head shifts into extension. This movement narrows the airway and adds strain to the cervical spine.
An oversized collar also allows rotation. The device does not lock the head, so the patient can turn the chin toward the chest. When the patient shifts position, the collar slides upward. It then presses on the jaw, the ears, and the skin behind the ears. Prolonged pressure on those areas causes skin breakdown quickly.
A collar that is too short creates flexion. The chin drops toward the chest, closing the airway and adding tension to the neck. The device fails to block movement.
The patient can lift the head or turn it side to side, which defeats immobilization. The lower edge digs into the clavicles. The front edge presses on the trachea. An incorrectly sized cervical collar, whether loose or tight, produces both hypermobility and pressure injury.
Sizing should never rely on a patient's body size or clothing size. A correctly fitted cervical immobilization collar supports the chin, holds the neck in neutral alignment, and stays snug without excessive pressure points. Accurate measurement makes the difference between support and harm.
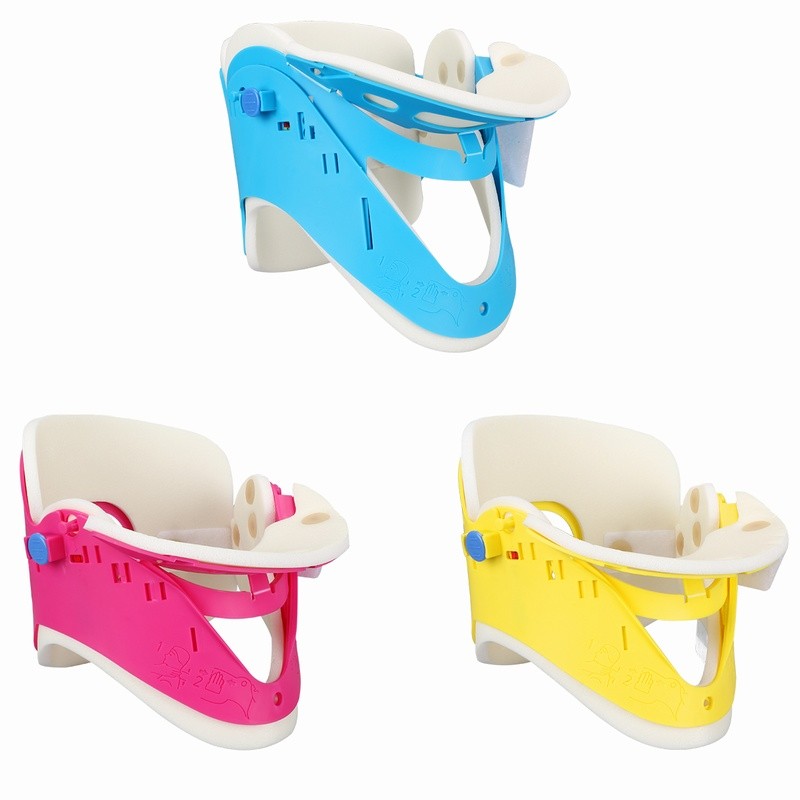
To measure a patient for a cervical collar, you start with one clear landmark. You do not guess. You do not rely on body size. The measurement is quick. You need two rescuers. One rescuer holds manual in-line stabilization. The other rescuer measures and prepares the device.
The measuring process centers on the trapezius muscle. You find its highest point at the top of the shoulders, just above the collarbone. You measure from that landmark up to the bottom of the chin. This space/distance controls the fit that follows. Extrication collar sizing depends on this vertical line.
Start with the finger method. Extend your hand beside the patient's neck. Keep your fingers flat and together. Place your little finger on the upper edge of the trapezius muscle, near the shoulder. Count how many fingers fit in the space from that landmark up to the patient's chin line. The count becomes your working measurement. This method serves as a clinical estimate. The estimate works because only a limited number of collar sizes exist.
You need a second rescuer to measure the patient for the correct collar size. One rescuer maintains manual cervical stabilization continuously. The other rescuer obtains the finger count and selects the collar. Never pause stabilization to measure. The measurement loses all value if the patient turns or lifts the head.
You can also measure in centimeters from the same two landmarks. Measure the vertical distance from the highest point of the trapezius muscle to the bottom of the chin. The measurement yields a centimeter value. You compare that value against the manufacturer's chart. Both approaches work. The finger method works faster in the field because your hand is always available.
A measurement only becomes useful when you compare it to the collar's own sizing gauge. Every manufacturer builds a rigid gauge into the collar packaging. You hold the gauge against the patient's neck. You match your finger count or centimeter value to the printed scale. Do not evaluate the fit by eye. Do not choose the collar based on the patient's build.
Transfer the measured count to the scale on an adjustable collar. Lock the size once the gauge matches your reading. The lock adjusts the collar height to fit the jaw-to-trapezius distance you recorded. This is how you size a cervical collar with confidence.
Rigid collars come in four common categories. These are Tall, Regular, Short, and No-neck sizes. That same gauge converts your measurement into one of these categories. Each manufacturer publishes its own chart for this conversion. The conversion charts vary between brands. You must use the chart included with the specific collar in your kit. A chart from another brand will not guarantee a correct fit.
This process represents cervical collar sizing done well. You measure once. You compare the result to the gauge. You select the correct category. The whole operation is quick. c-collar sizing fails only when you skip a step.
One caution applies. Even adjustable adult collars require individual measurement. They are not sized by the patient's build or a generic chart.
A correctly fitted c-collar keeps the neck in neutral alignment. It supports the chin without lifting it. It stays snug without creating pressure points. You achieve that fit through measurement, not through visual estimation.
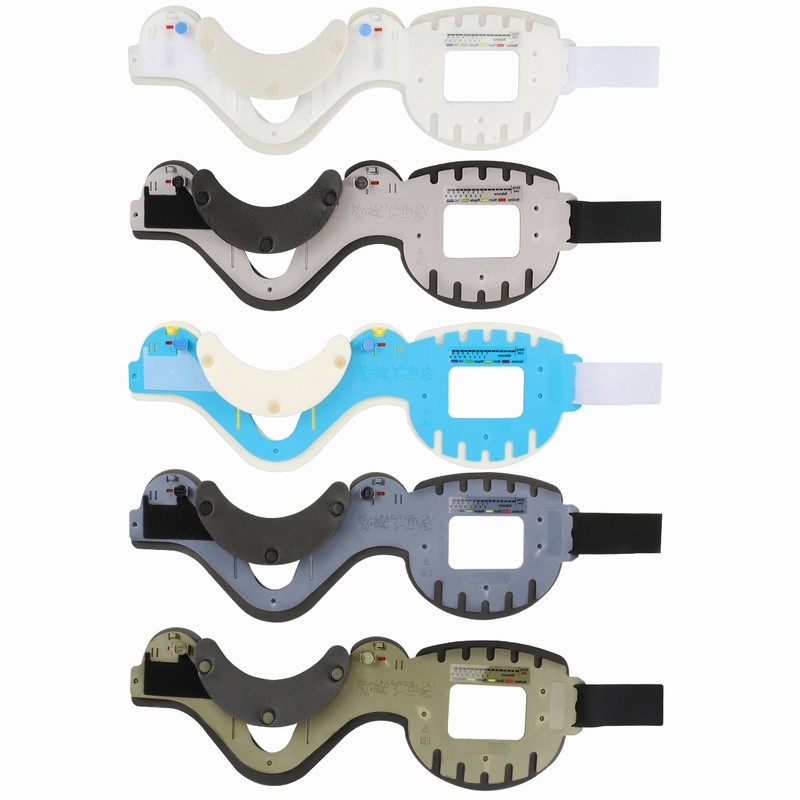
You have the measurement. Now you must place the device. Cervical collar sizing and placement depend on team discipline.
Provider One takes the head. Provider Two takes the collar. These roles stay separate until the device is secure. Both rescuers protect the cervical spine from the first touch to the final click.
Manual in-line stabilization is the foundation of cervical collar placement. Provider One stands at the patient's head, holds the head in neutral alignment, and keeps that hold from the start of the measurement to the final fastener. Never release stabilization to check fit. If the patient moves, the measurement loses meaning. Start over if you must.
Provider Two works from the patient's side. Use the finger-width method again. Place one hand flat on the patient's shoulder. Keep the fingers together. Place the pinky at the top of the shoulder. Find an imaginary horizontal line from the bottom of the chin. Count the finger-widths from the pinky to that line. Match the count to the collar's sizing gauge. Do not size a cervical collar from memory. Do not use the patient's build as a guide. An adult's clothing size does not predict the neck measurement.
Follow this sequence to size and apply a cervical collar.
Provider Two pre-sets the collar to the measured size without touching the patient's head.
Position the chin piece first. Place it against the patient's chin.
Wrap the back piece around the neck.
Secure the fastener without pulling the head out of alignment.
Keep the front edge below the chin line. The strap should lie flat. A twisted strap can change the collar fit.
Do not release stabilization after the fastener clicks. Confirm the fit first. Use the same checks on every patient.
First, check the space. About two fingers between the collar and neck should fit. Less space means the collar presses too hard. More space means the collar may slide.
Second, ask the patient to open the mouth. The jaw should move freely. The chin piece should not force the head up or down. Neutral alignment means no flexion, no extension, and no rotation.
Third, confirm the collar is locked at the measured size.
Complete the confirmation with a functional test. Place one hand on each side of the head. Apply gentle pressure. The head should not tilt forward, backward, or sideways. If the head moves, remove the collar and start over. You must recheck the fit whenever any part shifts.
Only after all checks pass, give the handoff. Provider One hears the exact words: "The collar's secure, you're clear." Provider One releases manual in-line stabilization. Never release on assumption. Never release before the confirming provider speaks.
This sequence shows how to size and apply a cervical collar correctly. Use the same steps on every trauma patient. A properly fitted c-collar supports the jaw, blocks unwanted motion, and stays comfortable during transport.
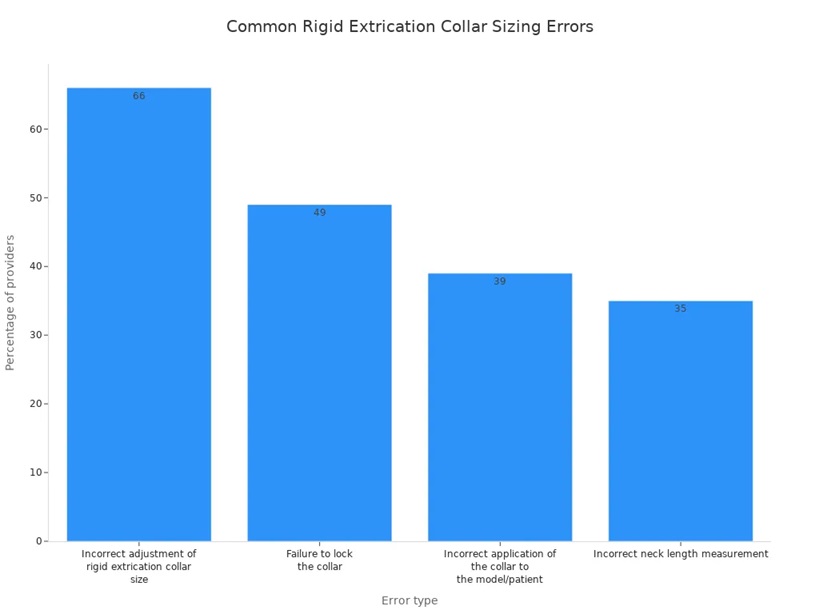
Even trained providers slip into guessing. One study of emergency medical services personnel found that 66% adjusted the rigid collar size incorrectly, while 35% measured the neck length wrong. These errors are avoidable. They follow two predictable patterns: estimating by eye and applying before measuring.
Visual estimation fails because the collar fit depends on the vertical chin-to-trapezius distance. The highest point of the trapezius muscle sits close to the neck, and the bottom of the chin overhangs it. You cannot judge that gap reliably by looking. The trapezius-to-chin method uses two fixed anatomical landmarks, so the measurement stays objective.
The measurement must be straight and vertical. If you tilt toward the shoulder, you get a shorter reading, which leads to an undersized collar that crowds the jaw and compromises the airway. Rigid collars are less forgiving than soft collars. Every sizing mistake matters more because the hard frame cannot flex to compensate. Rigid collars also transfer pressure directly to the skin. Manufacturer charts are built around this vertical measurement. When you skip it and estimate by appearance, you bypass the validated method.
Cervical collar sizing and placement start with one rule: measure before applying. Use the manufacturer's gauge, then select the correct height for the anatomy. Never rely on memory, a generic chart, or the patient's build. An adult patient's shirt size does not predict neck length.
Two providers keep separate roles. Provider One holds manual in-line stabilization. Provider Two measures with the finger-width method, compares the count to the gauge on the collar, and pre-sets the device. If Provider Two applies the collar without measuring, the fit is pure guesswork. An undersized collar blocks the airway; an oversized one fails to immobilize. You cannot size a cervical collar correctly after it is on the patient. Measure first, place the c-collar, then verify.
Measure from the highest point of the trapezius to the bottom of the chin. Match that reading to the manufacturer's gauge. This core step drives every extrication collar sizing decision. A correctly sized collar supports the chin, keeps the neck in neutral alignment, and fits snugly without pressure points. Confirm the collar fit while a second rescuer maintains manual in-line stabilization. Never release the head until the device is secure. You can size and apply a cervical collar correctly with the same sequence each time. Cervical collar sizing and placement becomes routine when you measure first. Reliable equipment helps. Use the manufacturer's gauge that comes with the specific collar in your kit. Fit every adult confidently.
No. You must measure before you apply the device. Once the collar sits on the neck, you cannot judge the chin-to-trapezius distance. Remove the collar and start the sizing process again if you skipped the measurement.
Check for about two fingers of space between the collar and the neck. Ask the patient to open the mouth. The jaw should move freely. The head should stay in neutral alignment with no flexion, extension, or rotation.
Most manufacturers offer four adult categories: Tall, Regular, Short, and No-neck. Each brand publishes its own conversion chart. Use the gauge that ships with your specific c-collar, because charts vary between manufacturers.
No. Even adjustable adult collars require individual measurement before application. They are not sized by the patient's build or a generic chart.
Your hand is always available in the field. Place your little finger at the top of the shoulder and count finger-widths up to the chin line. Match that count to the collar's gauge. The method gives a fast, repeatable estimate.

 IPv6 network supported


 English
 فارسی
فارسی français
 Deutsch
 русский
 italiano
 español
 português
 العربية
 Türkçe